how to draw a scorpion step by step
Lighter grays were used for the belly. 2. Go through each aspect of the scorpion drawing with attention to detail.
We want to place the seven segments of the mesosoma or back of the scorpion in a row that falls on a horizontal plane. With the help of my website, even a child can learn to draw like a real artist!
CLICK IMAGE FOR BIGGER VERSION Step 2: Now we draw the body which is like a slender curved tube arising from behind the head going towards the left. As we shade around the prosoma, we will come to the front legs of the scorpion. A new step-by-step drawing tutorial from imagidraw.com. (adsbygoogle = window.adsbygoogle || []).push({});
, Anime/Manga Characters
You could look at some of these other species and maybe depict one of them instead. Step 2 Draw the first pincer for your scorpion drawing Scorpions are known for two elements in particular: the pincers and the tail. There are a lot of other options as well. Youve added one pincer arm so far in this guide on how to draw a scorpion, so now its time to add the other! Once the fangs are done, along with the legs, start coloring and you are done. Learning how to draw a scorpion is easy if you break things down into simple steps. Make sure that the shadow connects to every part of the scorpion that makes contact with the ground. Webhow to draw a scorpion step by stepcheese trail wisconsin lodging. * Some of the links in this post may be affiliate links. Halloween Make outline for legs. We will want a normal HB pencil, as well as a pen, eraser, and sharpener. Necessary cookies are absolutely essential for the website to function properly. You can use some curved lines coming out from under the head for the arm portion, and then draw a similar pincer to the one you drew in the previous step. We will proceed with our pencils and erasers, slowly tweaking and adding to the drawing details that contextualize the insect more distinctly. Add another oval that's standing upright, then a longer oval that is angled to the left. 2. Start with the tail and keep it pointy. That's why we created this blog.
A white Gelly Roll pen was used to add in some highlights. A new step-by-step drawing tutorial from imagidraw.com.
We may use cookies to ensure that we give you the best experience on our website. If you dont know what your style is, you need more practice. Step 2: Now we draw the body which is like a slender curved tube arising from behind the head going towards the left. Step 4 Make eyes & eye brows. By doing this, we create an exoskeletal effect, which will result in a more realistic scorpion tale. You also have many options available for the different art mediums you can use. Scorpions may be tough creatures, but hopefully by using this guide drawing one wasnt tough at all!  These legs will connect to the mesosoma of the scorpion, which has seven segments, excluding the prosoma or head area.
Once we have captured the shape of the scorpion through a basic scorpion sketch, we will work with colored pencils to create different color values within the scorpion. 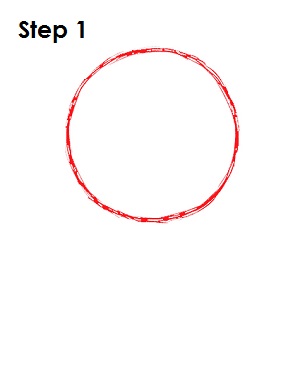
Depict the tail of the scorpion. We also want to make sure that each of the features has the correct number of segments. Consider using a diagram from the internet to assist you in your drawing process of the scorpion. Step 2: Next, lets draw two more forks of this scorpion.
 Draw an oval shape and add lines on it like lettuce. Now that we know what to expect, let us go through this tutorial on how to draw a scorpion. Required fields are marked *. CLICK IMAGE FOR BIGGER VERSION Step 2: Now we draw the body which is like a slender curved tube arising from behind the head going towards the left. Step 2: Next, lets draw two more forks of this scorpion. Draw a curved line for where the head will go. Out of these, the cookies that are categorized as necessary are stored on your browser as they are essential for the working of basic functionalities of the website. A scorpion's legs are also segmented and has a lot of joints.
Step 6: Dont forget to draw eyes for it. Then draw the shape of the head, the eyes, and the mouth parts. CLICK IMAGE FOR BIGGER VERSION Step 2: Now we draw the body which is like a slender curved tube arising from behind the head going towards the left. 2. The first segment should angle upward, and the second downward. At the top, add two arcs of different sizes, as well as curved lines to draw the tip of the tail. You dont have to spend hours at a time. Then quickly sketch out as many scorpions as you can before the timer goes off.
 858 followers. In this quick tutorial youll learn how to draw a Scorpion in just a few quick steps.
  At the top, add two arcs of different sizes, as well as curved lines to draw the tip of the tail. 1. Also, the scorpion has well-developed eyesight, because on its head there are from 2 to 8 eyes. How Do You Draw the Pincers of a Scorpion? We want to color in every segment of the scorpion to see the undertone of the scorpions color scheme.
 Depict the tail of the scorpion. CLICK IMAGE FOR BIGGER VERSION In China, it is a treadition for people to eat fried scorpions. Girls Once the fangs are done, along with the legs, start coloring and you are done. Congratulations, youve successfully learned how to draw a scorpion! 2. By doing this in each mesosoma we will find that it creates three-dimensionality within the scorpions exoskeleton. In this final step of your scorpion drawing, you can bring it to life with some amazing colors! You must go through each leg, making sure that you are adding pen marks to each.
Draw a tiny hollow circle on the right side, behid the head, now make two small long hollow rectangles. Scorpions are arachnids, just like spiders. 
You're just one step away! The head has a very rounded top as seen in the reference image. 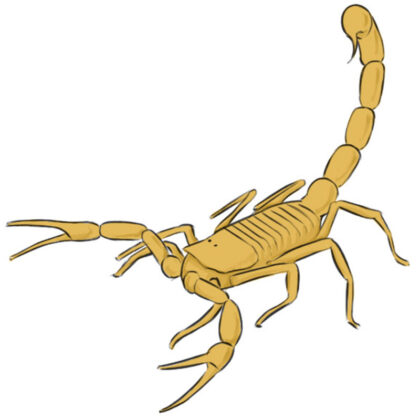 Step 8 In this quick tutorial you'll learn how to draw a Scorpion in 5 easy steps - great for kids and novice artists. Scorpions are poisonous. WebScorpions are easy to draw if you know the right techniques. Add a background to finish up your scorpion drawing. We will be creating a unique scorpion drawing using a basic set of materials, which will result in a realistic scorpion drawing. Step 5 Make shirt & belt. In this tutorial, we will be creating a realistic scorpion drawing using a set of colored pencils and a pen. We may use cookies to ensure that we give you the best experience on our website.
Follow along and learn with us! First commence the tutorial by making two circles & curve line. In this tutorial, we will be creating an interesting realistic scorpion drawing. Draw a pair of round eyes first. The legs are drawn like those of a spider. 7. The aim is to add skeletal line work that creates ridges that run along each segment in the tail. 3.
CLICK IMAGE FOR BIGGER VERSION Step 2: Add to small circles for the eyes toward the top of the head. Do you have a favorite type of scorpion that you could use?
I am sure that you have seen a scorpion many times in various films, cartoons, or books. Step 5 Make shirt & belt. Lastly, we want to draw a shadow underneath the scorpion. You have remained in mantis, walking stick, scorpion, carpenter ant, Japanese beetle, inchworm, centipede, termite, and other insects.
Start with the tail and keep it pointy.
1.
Many people fear these dangerous creatures, but many others love them, and some even keep them as pets! Make sure you spend time on the scorpion sketch before we move on to using color. We will spend some time on the pen drawing aspect, working through the whole skeletal structure of the scorpion until we are satisfied. In this quick tutorial you'll learn how to draw a Realistic Scorpion in 6 easy steps - great for kids and novice artists. Scorpions come in many different color schemes, so you can really get creative with your favorite colors! Depict three symmetrical curved lines on the right and left sides of the scorpions body. Step 5: Draw a long, curved tail.
Your final sketch should like the image on the right. These tails are what the scorpion will use to strike with its venom, and no scorpion drawing would be complete without it.
The bigger part will be left for the head. How to Draw a Ladybug Trapped In Amber Sap Fossil. At the bottom you can read some interesting facts about the Realistic Scorpion. We also want to outline the arms, and add some line work to the drawing. Step 8 Step 5 Make shirt & belt. For this example, I used two different gray markers for most of the scorpion drawing.
Recommended: Click on any image below to ENLARGEin gallery mode. Step 1: Let's draw a scorpion! Learning how to draw a scorpion is a great way to learn about a creature and its unique composition.  A new step-by-step drawing tutorial from imagidraw.com. Make this scorpion sketch easier with these 3 fun and easy tips! Step 2. First, you could look up some scorpions online to find some photos. The scorpion is considered a poisonous creature and its venom is very dangerous. (Step 1) Draw an oval for the head.
 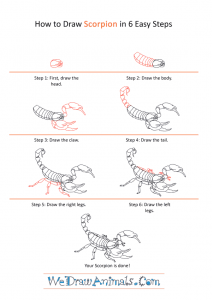 Thus, you probably know that the appearance of a scorpion is quite intimidating.
Include your email address to get a message when this question is answered. We want to do this simultaneously while drawing the mesosoma of the scorpion. As you can see in our picture, each leg will be made of two segments. Draw the rest of the tail like a string of beads. 2.1 Step 1: Shaping the Scorpion; 2.2 Step 2: Refining Your Scorpion Sketch; 2.3 Step 3: Adding Color to the Scorpion; 2.4 Step 4: Shading the Front Features of the Scorpion in Pen; 2.5 Step 5: Shading the Middle Features of the Scorpion in Pen; 2.6 Step 6: Shading the Back The tail goes upward and curved towards the right. 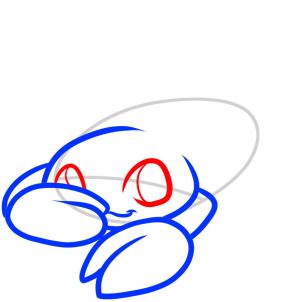
Draw a bigger eliptical shape with a long triangular pointed claw at the end. Click to view or download a printable file of this drawing guide. WebSketch out the pincers. Step 4 Make eyes & eye brows.
Roshanda is an art education blogger who is on a mission to coach and encourage as many aspiring artists as possible through the use of her blog. Draw a big oval at the end of each arm, then trace two lines through the middle, making the inside of the claws look like an eye. This is a tip that could also be used if you merely wish to make some variations on the drawing. That means they are active at night time. Download PDF A drawing is always made easier when you break it down into steps and take it slow, so we know that by following this guide you will end up with an amazing drawing! How to Draw a Realistic Scorpion Step-by-Step Tutorial, Previous post: How to Draw a Realistic Porcupine, Copyright 2022 We Draw Animals | Contact Us | About Us | Privacy Policy | Terms and Conditions | Disclaimer | Advertise. The lifespan of most scorpion species is unknown. Draw a line inside the oval, near where you would like the head (in this case, the lower part of the oval).
Each leg has several individual sections to them. Theres no denying that scorpions are very cool-looking creatures, but this unusual look can make it hard to learn how to draw a scorpion. Luckily, this guide will make it much easier to learn! The reference image will guide you as to how this should look! Hopefully, through the tutorial on how to draw a simple and beautiful scorpion for your baby, it will help you complete a meaningful picture. (Step 4) Draw a letter z shape in each claw. Step 3: Draw more solid armor on the scorpions body. Draw a large horizontal (but slightly diagonal) oval at the center of the paper. Step 3: Draw more solid armor on the scorpions body. You could use a color other than black as well. WebScorpions are easy to draw if you know the right techniques. You could also vary your line weights to make your drawing even more interesting. Trace about four lines on one side to outline the body. 3. Step 6: Dont forget to draw eyes for it. We want to use the dark contrast quality of the black pen to emphasize the different features of the scorpion.

WebStep 1: Draw the head of this scorpion. This could be done by combining some of the separate sections and instead drawing some lines across where the sections would be connected.
These will serve as the scorpions claws.
Continue drawing the tail until you get to the length you want it to be. We used a more muted brown color set for our example image, but this is just one of many color schemes you can go with for your drawing. Heres how to do a scorpion sketch practice exercise. 3. 2. The cookies is used to store the user consent for the cookies in the category "Necessary". Step 3 Make outline for head & face.
Or use an entirely different color scheme. Learning how to draw a scorpion with markers is much easier than you might think. Make outline for legs. The body of a scorpion is covered with a very strong shell, so it has practically no enemies that can harm it. To give the pincers a realistic scorpion effect, one can make them slightly darker with brown shading, as well as add little hairs to the pincers. For a more striking and vibrant look, you could use acrylic paints or colored pens. Finish with the pincer by tracing a circle and adding a triangle at the tip. Draw the rest of the tail like a string of beads.
Draw the rest of the tail like a string of beads. We want to make sure we work our way through the entire metasoma, also adding in darker marks at each connection point between the tails different segments. Then add each section making them smaller as they go towards the tail of your scorpion. Draw the mouth over the eyes. Drawing a scorpion is a fun task because it provides a unique challenge due to the strange composition of a scorpion. Using our HB pencils, we want to sketch out the general form of the scorpion with some light line-work. The bigger part will be left for the head. 2.1 Step 1: Shaping the Scorpion; 2.2 Step 2: Refining Your Scorpion Sketch; 2.3 Step 3: Adding Color to the Scorpion; 2.4 Step 4: Shading the Front Features of the Scorpion in Pen; 2.5 Step 5: Shading the Middle Features of the Scorpion in Pen; 2.6 Step 6: Shading the Back
At the top, add two arcs of different sizes, as well as curved lines to draw the tip of the tail. House Third, you need to use colors that are similar to each other if you want to create a smooth transition of color. Before moving on to the next step, make any adjustments you want to make to your drawing. This cookie is set by GDPR Cookie Consent plugin. We want to use pen marks to create sections like a hexagonal shape in each segment. By using our site, you agree to our, {"smallUrl":"https:\/\/www.wikihow.com\/images\/thumb\/a\/a5\/Draw-a-Scorpion-Step-1.jpg\/v4-460px-Draw-a-Scorpion-Step-1.jpg","bigUrl":"\/images\/thumb\/a\/a5\/Draw-a-Scorpion-Step-1.jpg\/aid3872877-v4-728px-Draw-a-Scorpion-Step-1.jpg","smallWidth":460,"smallHeight":345,"bigWidth":728,"bigHeight":546,"licensing":"
License: Creative Commons<\/a> License: Creative Commons<\/a> License: Creative Commons<\/a> License: Creative Commons<\/a> License: Creative Commons<\/a> License: Creative Commons<\/a> License: Creative Commons<\/a> License: Creative Commons<\/a> License: Creative Commons<\/a> License: Creative Commons<\/a> License: Creative Commons<\/a> License: Creative Commons<\/a> License: Creative Commons<\/a> License: Creative Commons<\/a> License: Creative Commons<\/a> License: Creative Commons<\/a> License: Creative Commons<\/a>
\n<\/p>
\n<\/p><\/div>"}, {"smallUrl":"https:\/\/www.wikihow.com\/images\/thumb\/b\/bb\/Draw-a-Scorpion-Step-2.jpg\/v4-460px-Draw-a-Scorpion-Step-2.jpg","bigUrl":"\/images\/thumb\/b\/bb\/Draw-a-Scorpion-Step-2.jpg\/aid3872877-v4-728px-Draw-a-Scorpion-Step-2.jpg","smallWidth":460,"smallHeight":345,"bigWidth":728,"bigHeight":546,"licensing":"
\n<\/p>
\n<\/p><\/div>"}, {"smallUrl":"https:\/\/www.wikihow.com\/images\/thumb\/3\/36\/Draw-a-Scorpion-Step-3.jpg\/v4-460px-Draw-a-Scorpion-Step-3.jpg","bigUrl":"\/images\/thumb\/3\/36\/Draw-a-Scorpion-Step-3.jpg\/aid3872877-v4-728px-Draw-a-Scorpion-Step-3.jpg","smallWidth":460,"smallHeight":345,"bigWidth":728,"bigHeight":546,"licensing":"
\n<\/p>
\n<\/p><\/div>"}, {"smallUrl":"https:\/\/www.wikihow.com\/images\/thumb\/8\/86\/Draw-a-Scorpion-Step-4.jpg\/v4-460px-Draw-a-Scorpion-Step-4.jpg","bigUrl":"\/images\/thumb\/8\/86\/Draw-a-Scorpion-Step-4.jpg\/aid3872877-v4-728px-Draw-a-Scorpion-Step-4.jpg","smallWidth":460,"smallHeight":345,"bigWidth":728,"bigHeight":546,"licensing":"
\n<\/p>
\n<\/p><\/div>"}, {"smallUrl":"https:\/\/www.wikihow.com\/images\/thumb\/0\/06\/Draw-a-Scorpion-Step-5.jpg\/v4-460px-Draw-a-Scorpion-Step-5.jpg","bigUrl":"\/images\/thumb\/0\/06\/Draw-a-Scorpion-Step-5.jpg\/aid3872877-v4-728px-Draw-a-Scorpion-Step-5.jpg","smallWidth":460,"smallHeight":345,"bigWidth":728,"bigHeight":546,"licensing":"
\n<\/p>
\n<\/p><\/div>"}, {"smallUrl":"https:\/\/www.wikihow.com\/images\/thumb\/c\/cc\/Draw-a-Scorpion-Step-6.jpg\/v4-460px-Draw-a-Scorpion-Step-6.jpg","bigUrl":"\/images\/thumb\/c\/cc\/Draw-a-Scorpion-Step-6.jpg\/aid3872877-v4-728px-Draw-a-Scorpion-Step-6.jpg","smallWidth":460,"smallHeight":345,"bigWidth":728,"bigHeight":546,"licensing":"
\n<\/p>
\n<\/p><\/div>"}, {"smallUrl":"https:\/\/www.wikihow.com\/images\/thumb\/f\/fc\/Draw-a-Scorpion-Step-7.jpg\/v4-460px-Draw-a-Scorpion-Step-7.jpg","bigUrl":"\/images\/thumb\/f\/fc\/Draw-a-Scorpion-Step-7.jpg\/aid3872877-v4-728px-Draw-a-Scorpion-Step-7.jpg","smallWidth":460,"smallHeight":345,"bigWidth":728,"bigHeight":546,"licensing":"
\n<\/p>
\n<\/p><\/div>"}, {"smallUrl":"https:\/\/www.wikihow.com\/images\/thumb\/5\/5b\/Draw-a-Scorpion-Step-8.jpg\/v4-460px-Draw-a-Scorpion-Step-8.jpg","bigUrl":"\/images\/thumb\/5\/5b\/Draw-a-Scorpion-Step-8.jpg\/aid3872877-v4-728px-Draw-a-Scorpion-Step-8.jpg","smallWidth":460,"smallHeight":345,"bigWidth":728,"bigHeight":546,"licensing":"
\n<\/p>
\n<\/p><\/div>"}, {"smallUrl":"https:\/\/www.wikihow.com\/images\/thumb\/9\/92\/Draw-a-Scorpion-Step-9.jpg\/v4-460px-Draw-a-Scorpion-Step-9.jpg","bigUrl":"\/images\/thumb\/9\/92\/Draw-a-Scorpion-Step-9.jpg\/aid3872877-v4-728px-Draw-a-Scorpion-Step-9.jpg","smallWidth":460,"smallHeight":345,"bigWidth":728,"bigHeight":546,"licensing":"
\n<\/p>
\n<\/p><\/div>"}, {"smallUrl":"https:\/\/www.wikihow.com\/images\/thumb\/e\/e3\/Draw-a-Scorpion-Step-10.jpg\/v4-460px-Draw-a-Scorpion-Step-10.jpg","bigUrl":"\/images\/thumb\/e\/e3\/Draw-a-Scorpion-Step-10.jpg\/aid3872877-v4-728px-Draw-a-Scorpion-Step-10.jpg","smallWidth":460,"smallHeight":345,"bigWidth":728,"bigHeight":546,"licensing":"
\n<\/p>
\n<\/p><\/div>"}, {"smallUrl":"https:\/\/www.wikihow.com\/images\/thumb\/9\/9c\/Draw-a-Scorpion-Step-11.jpg\/v4-460px-Draw-a-Scorpion-Step-11.jpg","bigUrl":"\/images\/thumb\/9\/9c\/Draw-a-Scorpion-Step-11.jpg\/aid3872877-v4-728px-Draw-a-Scorpion-Step-11.jpg","smallWidth":460,"smallHeight":345,"bigWidth":728,"bigHeight":546,"licensing":"
\n<\/p>
\n<\/p><\/div>"}, {"smallUrl":"https:\/\/www.wikihow.com\/images\/thumb\/d\/d8\/Draw-a-Scorpion-Step-12.jpg\/v4-460px-Draw-a-Scorpion-Step-12.jpg","bigUrl":"\/images\/thumb\/d\/d8\/Draw-a-Scorpion-Step-12.jpg\/aid3872877-v4-728px-Draw-a-Scorpion-Step-12.jpg","smallWidth":460,"smallHeight":345,"bigWidth":728,"bigHeight":546,"licensing":"
\n<\/p>
\n<\/p><\/div>"}, {"smallUrl":"https:\/\/www.wikihow.com\/images\/thumb\/d\/d0\/Draw-a-Scorpion-Step-13.jpg\/v4-460px-Draw-a-Scorpion-Step-13.jpg","bigUrl":"\/images\/thumb\/d\/d0\/Draw-a-Scorpion-Step-13.jpg\/aid3872877-v4-728px-Draw-a-Scorpion-Step-13.jpg","smallWidth":460,"smallHeight":345,"bigWidth":728,"bigHeight":546,"licensing":"
\n<\/p>
\n<\/p><\/div>"}, {"smallUrl":"https:\/\/www.wikihow.com\/images\/thumb\/9\/91\/Draw-a-Scorpion-Step-14.jpg\/v4-460px-Draw-a-Scorpion-Step-14.jpg","bigUrl":"\/images\/thumb\/9\/91\/Draw-a-Scorpion-Step-14.jpg\/aid3872877-v4-728px-Draw-a-Scorpion-Step-14.jpg","smallWidth":460,"smallHeight":345,"bigWidth":728,"bigHeight":546,"licensing":"
\n<\/p>
\n<\/p><\/div>"}, {"smallUrl":"https:\/\/www.wikihow.com\/images\/thumb\/4\/4a\/Draw-a-Scorpion-Step-15.jpg\/v4-460px-Draw-a-Scorpion-Step-15.jpg","bigUrl":"\/images\/thumb\/4\/4a\/Draw-a-Scorpion-Step-15.jpg\/aid3872877-v4-728px-Draw-a-Scorpion-Step-15.jpg","smallWidth":460,"smallHeight":345,"bigWidth":728,"bigHeight":546,"licensing":"
\n<\/p>
\n<\/p><\/div>"}, {"smallUrl":"https:\/\/www.wikihow.com\/images\/thumb\/b\/b8\/Draw-a-Scorpion-Step-16.jpg\/v4-460px-Draw-a-Scorpion-Step-16.jpg","bigUrl":"\/images\/thumb\/b\/b8\/Draw-a-Scorpion-Step-16.jpg\/aid3872877-v4-728px-Draw-a-Scorpion-Step-16.jpg","smallWidth":460,"smallHeight":345,"bigWidth":728,"bigHeight":546,"licensing":"
\n<\/p>
\n<\/p><\/div>"}, {"smallUrl":"https:\/\/www.wikihow.com\/images\/thumb\/3\/38\/Draw-a-Scorpion-Step-17.jpg\/v4-460px-Draw-a-Scorpion-Step-17.jpg","bigUrl":"\/images\/thumb\/3\/38\/Draw-a-Scorpion-Step-17.jpg\/aid3872877-v4-728px-Draw-a-Scorpion-Step-17.jpg","smallWidth":460,"smallHeight":345,"bigWidth":728,"bigHeight":546,"licensing":"
\n<\/p>
\n<\/p><\/div>"}, {"smallUrl":"https:\/\/www.wikihow.com\/images\/thumb\/e\/ed\/Draw-a-Scorpion-Step-18.jpg\/v4-460px-Draw-a-Scorpion-Step-18.jpg","bigUrl":"\/images\/thumb\/e\/ed\/Draw-a-Scorpion-Step-18.jpg\/aid3872877-v4-728px-Draw-a-Scorpion-Step-18.jpg","smallWidth":460,"smallHeight":345,"bigWidth":728,"bigHeight":546,"licensing":"